Midnightバリデーターモードで起動
本ドキュメントは、Midnightサーバーで行うMidnight-node起動の手順です。
1. PostgreSQL 接続設定
ここではMidnightサーバーのコマンドからはじめ、インデクサーサーバーのタブに進んでください。
FW_ALLOW_HOST="$(curl -s https://api.ipify.org)"
echo "FW_ALLOW_HOST=${FW_ALLOW_HOST}"
上記、コマンドで出力された戻り値をコピーして、インデクサーサーバーで実行してください。
FW_ALLOW_HOST=***.**.**.**
Midnightサーバーでコピーしたコマンドを実行します。
postgreSQLポート許可
sudo ufw allow from ${FW_ALLOW_HOST} to any port 5432
戻り値: Rule added
sudo ufw reload
戻り値:Firewall reloaded
postgreSQLログイン許可設定
echo "hostssl cexplorer $(whoami) ${FW_ALLOW_HOST}/32 scram-sha-256" | \
sudo tee -a /etc/postgresql/17/main/pg_hba.conf > /dev/null
sudo grep -n "hostssl cexplorer" /etc/postgresql/17/main/pg_hba.conf
133:hostssl cexplorer <インデクサーサーバーのユーザー名> <MidnightサーバーのIP>/32 scram-sha-256
postgresql再起動
sudo systemctl restart postgresql
ファイル転送
インデクサーサーバーの$HOME直下にある.pgpassをMidnightサーバーの$HOME直下にコピーします。
graph LR
A[インデクサーサーバー] -->|.pgpass| B[Midnightサーバー];.pgpassファイルは必ず$HOME(ユーザーディレクトリ直下)に配置してください。
1-1. PostgreSQL接続チェック
.pgpassファイルパーミッション変更
chmod 600 $HOME/.pgpass
PostgreSQL 17 を使用するためインストールします。
順に実行してください。
sudo apt update
sudo apt install -y curl ca-certificates
sudo install -d /usr/share/postgresql-common/pgdg
sudo curl -s -o /usr/share/postgresql-common/pgdg/apt.postgresql.org.asc --fail https://www.postgresql.org/media/keys/ACCC4CF8.asc
sudo sh -c 'echo "deb [signed-by=/usr/share/postgresql-common/pgdg/apt.postgresql.org.asc] \
  https://apt.postgresql.org/pub/repos/apt $(lsb_release -cs)-pgdg main" \
  > /etc/apt/sources.list.d/pgdg.list'
sudo apt update
sudo apt install postgresql-client-17 -y
psql --version
psql (PostgreSQL) 17.7 (Ubuntu 17.7-3.pgdg22.04+1)
接続テスト
PGPASS_LINE=$(cat $HOME/.pgpass)
DBSYNC_HOST=$(echo "$PGPASS_LINE" | cut -d: -f1)
DBSYNC_USER=$(echo "$PGPASS_LINE" | cut -d: -f4)
psql "postgresql://${DBSYNC_USER}@${DBSYNC_HOST}:5432/cexplorer?sslmode=require"
psql (17.7 (Ubuntu 17.7-3.pgdg22.04+1))
SSL connection (protocol: TLSv1.3, cipher: TLS_AES_256_GCM_SHA384, compression: off, ALPN: postgresql)
# ↑この文言があればSSL/TSL通信が確立しています。
Type "help" for help.

cexplorer=# \q
SSL/TSL通信の確立が確認できたら、
\qを入力後、 Enter
2. Midnight 起動パラメーターファイル作成
postgreSQL接続情報取得
PGPASS_LINE=$(cat $HOME/.pgpass)
DBSYNC_HOST=$(echo "$PGPASS_LINE" | cut -d: -f1)
DBSYNC_USER=$(echo "$PGPASS_LINE" | cut -d: -f4)
cat > $HOME/midnight/.env << EOF

#ネットワーク
CFG_PRESET=${MIDNIGHT_NETWORK}

#Midnightキーディレクトリ
BASE_PATH='$HOME/midnight/data'

#パートナーチェーン固有パラメーターファイル
ADDRESSES_JSON=$HOME/midnight/addresses.json

#Midnight起動ポート番号
MIDNIGHT_PORT=30333

#cardano-db-syncデータ取得 PostgreSQL接続URI
DB_SYNC_POSTGRES_CONNECTION_STRING="postgresql://${DBSYNC_USER}@${DBSYNC_HOST}:5432/cexplorer?sslmode=require"

#Midnight-nodeシークレットキー
NODE_KEY="$(cat $HOME/midnight/data/chains/partner_chains_template/network/secret_ed25519)"

#カルダノセキュリティパラメーター
CARDANO_SECURITY_PARAMETER=432

#P2P接続先
BOOTNODES="/dns/boot-node-01.${MIDNIGHT_NETWORK}.midnight.network/tcp/30333/ws/p2p/12D3KooWMjUq13USCvQR9Y6yFzYNYgTQBLNAcmc8psAuPx2UUdnB \\
        /dns/boot-node-02.${MIDNIGHT_NETWORK}.midnight.network/tcp/30333/ws/p2p/12D3KooWR1cHBUWPCqk3uqhwZqUFekfWj8T7ozK6S18DUT745v4d \\
        /dns/boot-node-03.${MIDNIGHT_NETWORK}.midnight.network/tcp/30333/ws/p2p/12D3KooWQxxUgq7ndPfAaCFNbAxtcKYxrAzTxDfRGNktF75SxdX5"

#追加オプション
APPEND_ARGS="--validator --allow-private-ip --pool-limit 10 --trie-cache-size 0 --prometheus-external --rpc-methods=auto --rpc-port 9944 --public-addr /ip4/$(curl -4 -s ifconfig.me)/tcp/30333 --keystore-path=$HOME/midnight/data/chains/partner_chains_template/keystore/"

#ネットワークスペックファイルパス
CHAIN=$HOME/midnight/chain-spec.json
EOF
2-1.Midnight-node起動設定
systemdサービスファイル作成
cat > $HOME/midnight/midnight-node.service << EOF
[Unit]
Description     = Midnight Node Service
Wants           = network-online.target
After           = network-online.target

[Service]
Type=simple
User=${USER}
WorkingDirectory=${HOME}/midnight
EnvironmentFile=${HOME}/midnight/.env
ExecStart="${HOME}/midnight/midnight-node"
KillSignal=SIGINT
RestartKillSignal=SIGINT
TimeoutStopSec=300
LimitNOFILE=32768
Restart=always
RestartSec=5
StandardOutput=syslog
StandardError=syslog
SyslogIdentifier=midnight-node

[Install]
WantedBy=multi-user.target
EOF
sudo cp $HOME/midnight/midnight-node.service /etc/systemd/system/midnight-node.service
sudo chmod 644 /etc/systemd/system/midnight-node.service
サービス有効化
sudo systemctl daemon-reload && sudo systemctl enable --now midnight-node
Midnightノード動作確認
sudo systemctl status midnight-node --no-pager
● midnight-node.service - Midnight Node Service
     Loaded: loaded (/etc/systemd/system/midnight-node.service; enabled; vendor preset: enabled)
     Active: active (running) since Tue 2025-12-30 07:18:14 UTC; 4h 42min ago
   Main PID: 212117 (midnight-node)
      Tasks: 18 (limit: 18679)
     Memory: 3.0G
        CPU: 3h 3min 55.713s
Active: active であること
ログ確認
sudo journalctl -u midnight-node -f
2025-12-31 05:56:14 Midnight Node
2025-12-31 05:56:14 ✌️  version 0.12.0-29935d2f
2025-12-31 05:56:14 ❤️  by Substrate DevHub <https://github.com/substrate-developer-hub>, 2017-2025
2025-12-31 05:56:14 📋 Chain specification: testnet-02-1
2025-12-31 05:56:14 🏷  Node name: madly-drug-7531
2025-12-31 05:56:14 👤 Role: AUTHORITY
2025-12-31 05:56:14 💾 Database: ParityDb at /home/midnightd/midnight/data/chains/testnet-02/paritydb/full
2025-12-31 05:56:14 Creating idx_tx_out_address index. This may take a while.
↑ 初回起動時は、インデックス作成のため処理に時間がかかります。
ログが再び出力され始めたことを確認したら、次の手順へ進んでください。
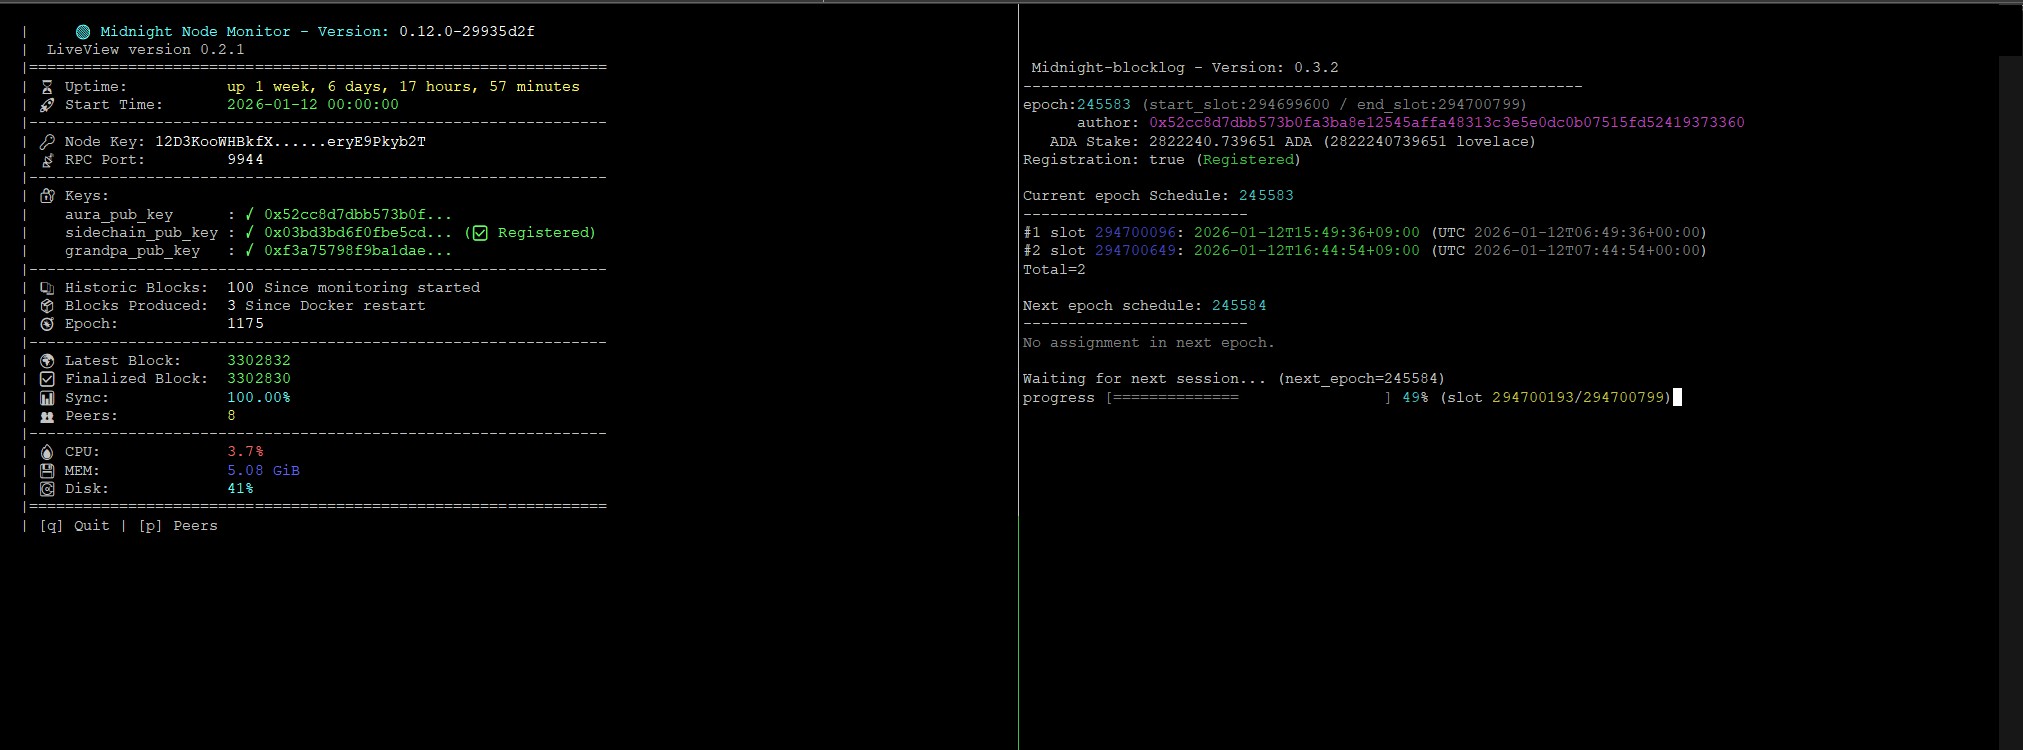
3. Midnight-Monitorインストール
Midnight-monitor
- LiveViewノードモニタリング
- Midnight-Blocklog スケジュール監視モード
LiveViewダウンロード
cd $HOME/midnight
wget -O ./LiveView.sh  https://raw.githubusercontent.com/btbf/Midnight-Live-View/refs/heads/main/LiveView.sh
chmod +x LiveView.sh
Midnight-blocklogのインストール
curl --proto '=https' --tlsv1.2 -sSf https://sh.rustup.rs | sh
1) Proceed with standard installation (default - just press enter)
1を選択するので Enter
source "$HOME/.cargo/env"
rustup toolchain install stable
rustup default stable
rustc -V
cargo -V
$ rustc -V
rustc 1.92.0 (ded5c06cf 2025-12-08)

$ cargo -V
cargo 1.92.0 (344c4567c 2025-10-21)
sudo apt update
sudo apt install -y build-essential pkg-config libssl-dev
cd $HOME
release="$(curl -s https://api.github.com/repos/btbf/Midnight-blocklog/releases/latest | jq -r '.tag_name')"
git clone https://github.com/btbf/Midnight-blocklog.git
cd Midnight-blocklog
git checkout ${release}
cargo install --path . --bin mblog --locked --force
mblog --version
mblog 0.3.2
依存関係インストール
sudo apt install -y tmux nano ruby-rubygems
sudo gem install tmuxinator
環境変数追加
echo export EDITOR='nano' >> $HOME/.bashrc
echo alias mux=tmuxinator >> $HOME/.bashrc
source $HOME/.bashrc
bash保管ファイルDL
sudo wget https://raw.githubusercontent.com/tmuxinator/tmuxinator/master/completion/tmuxinator.bash -O /etc/bash_completion.d/tmuxinator.bash
tmuxパネル設定ファイルDL
mkdir -p $HOME/.config/tmuxinator

cat > $HOME/.config/tmuxinator/midnight-monitor.yml << EOF
---
name: midnight-monitor
project_root: "$HOME/midnight"
windows:
- bash:
    layout: even-horizontal
    panes:
    - cd $HOME/midnight; ./LiveView.sh
    - mblog block --keystore-path $HOME/midnight/data/chains/partner_chains_template/keystore --tz Asia/Tokyo --db $HOME/midnight/mblog.db --watch
EOF
モニターパネルの操作方法
-
モニターパネルの起動(新規起動/アタッチ)
mux midnight-monitormidnight-monitorセッションを起動し、モニターパネルに接続します。
すでにセッションが存在する場合は、そのセッションに接続(アタッチ)されます。 -
モニターパネルを一時的に離れる(デタッチ)
Ctrl + B (離して) D
モニターパネルを終了せず、バックグラウンドで動作させます。 -
モニターパネルを再起動する(設定変更後など)
mux stop midnight-monitor
mux midnight-monitor
既存の
midnight-monitorセッションを停止し、
設定を反映するためにセッションを新しく起動し直します。
オンチェーン登録の反映について
オンチェーン登録は即時反映されません。
エポック更新後に有効化される仕様のため、反映まで待ち時間が発生します。
- Preview:約 2 日後
- Mainnet:約 10 日後
この期間中は ❌ Not Registered と表示される場合がありますが、異常ではありません。
上記の反映タイミングまでしばらくお待ちください。
以上となります。
3-1. Midnight-blocklogの使用方法
スケジュール追跡モードは上記のMidnight-monitorで起動されていますが、他の使い方をご紹介します。
各種コマンド
- スケジュールJSONの出力
mblog block --keystore-path $HOME/midnight/data/chains/partner_chains_template/keystore --tz UTC --output-json --current
現在 epoch のスケジュールを JSON 出力
mblog block --keystore-path $HOME/midnight/data/chains/partner_chains_template/keystore --tz UTC --output-json --next
次 epoch のスケジュールを JSON 出力
- ブロック生成実績の表示
mblog log --db $HOME/midnight/mblog.db
最新の epoch(デフォルト)
mblog log --db $HOME/midnight/mblog.db --epoch ******
epoch 指定(
243133等)